Using Excel to Import HR Language Codes
Posted by Author, Canine & Equine Choreographer, Citizen AI Data Scientist, and Dynamics 365 Global Black Belt at Microsoft on
As part of my GuygAX project, I found that a lot of data within the HR module was missing, because it Dynamics AX is not has not been published with the localization details for the realms of Faerûn. One case in point is that there are over 99 different languages within Faerûn that I needed to load into the HR module. Although loading the data by hand is possible, I wanted to find a better way to get the information loaded.
In this walkthrough I will show how I used the Excel Add-In for Dynamics AX to make the process a matter of cutting and pasting.
How to do it…
To import HR Language Codes through Excel, follow these steps:
- When looking the language codes within the HR employee and applicant records, they were initially missing.

In order to use the Excel Add-In to load the data, we need to find the table within Dynamics AX that is related to the form. To do this, right-mouse-click on the form that you want to import the data into, and then click the Personalize menu item.
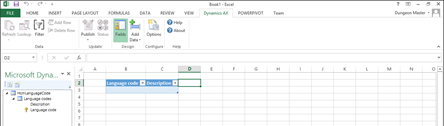
- This will open up the Personalization dialog. Select the Query tab, and you will be able to see all of the tables and queries that are related to the form. In this case, all of the language information is stored within the HcmLanguageCode table.

- Now open up Excel, select the Dynamics AX tab on the ribbon bar, and then click on the Add Data menu button, and choose the Add Tables option from the drop down.

- This will open up the table selection dialog. In the Filter field, you can type in the table name that you are looking for, and then select it, and click on the > button to select the table and add it to the worksheet.

- On the left hand side of Excel, the Table Explorer reference panel will be displayed. Just drag the fields over to the spreadsheet to start creating your import template.
- When you are finished, click the Fields button to hide the Table Explorer.
- Now, click the Refresh button in the Dynamics AX ribbon bar to retrieve any data. In this case, there is none.
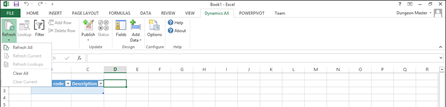
- Now, just add in all of the new data into Excel.

Note: Rather than key in all of the language codes, I plagiarized a little, and cut and paste the information from the Forgotten Realms Wiki.
- Once all of your data is in the Excel spreadsheet, click on the Publish button on the Dynamics AX ribbon bar, and choose the Publish All option to update Dynamics AX.

How it Works…
If you check the table within Dynamics AX now, all of the data (in our case the language codes) will be configured for you.

And we can now define the native languages of our employees and applicants.

Summary
How cool is that!
Share this post
- 0 comment
- Tags: Dynamics AX
0 comment