Import Data Using The Data Import Export Framework
Posted by Author, Curator, Visually Impared Squirrel Literacy Advocate & Dynamics AX Technical Solution Professional (TSP) at Microsoft on
Although Excel is a great way to import base data into Dynamics AX, sometime you need to bring in the big guns and that’s where the Data Import Export Framework applies. This is a new module that makes importing data into Dynamics AX so much simpler, especially when importing complex data types that include multiple dependent tables. All you need to do is check the data that you want to import and the D.I.E.F. will do the rest for you.
On a side note, “dief” in Dutch actually means “thief”. Is this a coincidence, or is it a reminder that the D.I.E.F. stealing data seem so simple?
How To Do It…
First we need to make sure that the Data Import Export Framework is configured. To do this, click on the Data Import/Export Framework Parameters menu item within the Setup group of the Data Import Export Framework area page.

When the Data Import/Export Framework Parameters maintenance form is displayed, make sure that you have a Shared Working Directory has been defined. If you don’t have one yet, just specify a working directory, and then click on the Validate button to make sure that you have the correct access to the folder.

Then click on the Close button to exit from the form.
Next we need to make sure that we have a data format defined that we will be using for our import files. To do that, click on the Source Data Format menu item within the Setup group of the Data Import Export Framework area page.

When the Source Data Formats maintenance form is displayed, make sure that you have some import formats defined. In this case we have a CSV format defined.
If you have not got any formats defined ye, just click on the New button in the menu bar to create a new record and specify your import preferences.

After you have configured your import format then just click on the Close button to exit from the form.
Now we can start importing data. To do that, just click on the Processing Group menu item within the Common group of the Data Import Export Framework area page.

When the Processing Group maintenance form is displayed, click the New button in the menu bar to create a new record, and then assign your record a Group Name and Description.
Once you have created your new Processing Group, click on the Entities button within the menu bar to start adding your import entities to your Processing Group.

When the Select Entities For Processing Group maintenance form is displayed, click on the New button in the menu bar to create a new record, and then from the Entity dropdown, select he type of data you want to import – in this case we will import products.

Then select the Source Data Format that you want to use for the import.

Next we need to specify the data that we want to import. To do this click on the Generate Source File button within the menu bar.

This will start up a wizard to guide you through the process. Click on the Next button to start the process.

When the Display Data page of the wizard is displayed, you can select any of the fields that have been mapped to your Entity, and also rearrange the order to your liking.
Once you have chosen all of the fields that you want, click on the Generate Sample File button.

This will create a new blank template for you based on the Source Data Format that you chose.

Save the file away to a working folder, we will need this in a second.

When you return to the Select Entities For Processing Group maintenance form, point the Sample File Path to point to the sample file that you just created.

Now we need to link all of the fields that we chose to import to all of the actual entities. To do that, click on the Generate Source Mapping button within the menu bar.

This should result in a pretty uneventful message saying that the mapping was successful.

If you click on the Modify Source Mapping button in the menu bar, then you will see what Dynamics AX has really done – link all of the source fields to the import staging table.

If you want to make doubly sure that everything is working, then click on the Validate button within the menu bar and you should have no errors.

Now open up the sample import file that you created.

All you need to do is paste in all of your data and save the file.

Now you can preview the data that you put in the import file by clicking on the Preview Source File menu button within the Select Entities For Processing Group maintenance form.

In the Preview area you will be able to see all of the data.

Click on the Close button to save your entities.
When you return to the Processing Group maintenance form, click on the Get Staging Data menu item to start the import process.

When the Create Job dialog box is displayed, give your import process a description and then click on the OK button.

When the Staging Data Extraction dialog box is displayed, you can test your data by clicking on the Preview button within the menu bar.

After a second or two, you will be able to look at the View Staging Preview detail tab on the form and see all of the data has been staged for you.

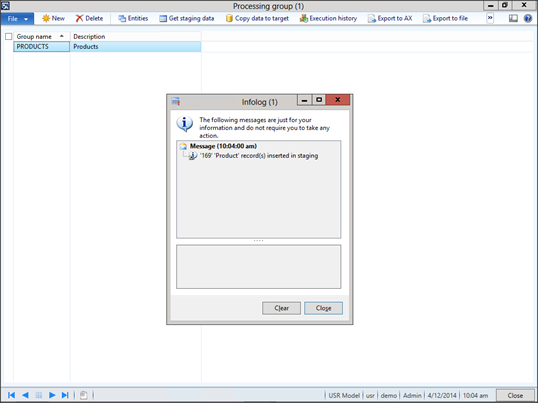
To start the real import, click on the Run button within the menu bar. When the Staging dialog box is displayed, just click on the OK button.

You should get a notification of the number of records that have been staged.
To update the real tables within Dynamics AX, just click on the Copy Data To Target button within the menu bar.

When the Select a Job To Run dialog box is displayed, select the job that you just created, and then click on the OK button.

This will open up a Target Data Extraction dialog box. Just click on the Run button within the menu bar.

Then click on the OK button to start the import.

The Data Import Export Framework will do all of the hard work for you.

How It Works…
Now when you look at your table within Dynamics AX all of your new data will be ready for you to use.

How cool is that.

Share this post
- 0 comment
- Tags: Dynamics AX
0 comment