Configuring a BYODB and Creating a Full and Incremental Entity Export
Posted by Author and Purveyor of the finest Collars & Tack for Canine & Equine Performances at Microsoft on
In a production environment for Dynamics 365 for Finance & Operations, the primary database is locked down so that you cannot query or maintain the database directly.
But there are a lot of times that we would like to have access to the data so that we can create integrations with other systems, to publish data out for others view or even to report off through other reporting tools.
So the big question is how do you do this?
The answer is through the BYODB (Bring Your Own Database) feature within Dynamics 365 that allows us to attach an external SQL database to our instance and then publish any of the data entities that are available within the Data Management framework out to the database.
In addition to doing full exports of the data, we can also schedule incremental updates as well that take advantage of the change tracking feature to push only the data that has changed within the entity rather than all of the data.
Although this may seem like a daunting effort, it’s not really that hard, and in this walkthrough we will show how to get everything wired up.
Topics Covered
- Creating an Azure SQL Database
- Configuring an Entity Export to Database
- Publishing Entities to the BYODB Datasource
- Creating an Entity Export Project
- Enabling Change Tracking on Data Entities
- Creating an Incremental Data Export Project
Creating an Azure SQL Database
The first step in the process is to create a new Azure SQL Server Database that we will use as the BYODB for Dynamics.
Spoiler Alert: This will cost you some Azure $ to set up.
How to do it…
We will start off by opening up our Azure Portal by going to portal.azure.com.
Here we also created a new workspace that we can use to track all of the resources that we create for this project.

Now we will want to create a new SQL Server resource that we will house our BYODB in.
To do this, just click on the Create a resource button on the left hand side of the Azure portal.

To find the SQL server resource template, just type in sql into the filter box. Then select the SQL server (logical server) resource type.

When the details for the SQL server (logical server) are displayed, just click on the Create button to create the resource.

This will take us to the configuration pane for the SQL server that we are creating.

We will now need to give our SQL Server a Server name.
For this database we will set the Server name to mufifebyodb.

Next we will want to set the Server admin login username that we will be using to authenticate with.
For this example we set the Server admin login to the same as the Server name to make it easier to remember.

And then we will want to specify the Password that we will be using to authenticate against the database with.

Next we will want to either create a new Resource group that we will put the SQL Server resource into, or use an exisiting Resource group.
To make it easier to track down all the resources used for this project we will create a new Resource group and set it to mufifebyodb.

And finally we will want to add this resource to our workspace so we checked the Pin to dashboard option.
After we have done that we can just click on the Create button to get Auzre to configure the resource for us.

That will return us to our workspace and we will see that the resource is queued for creation.

After a couple of seconds, we will have a new SQL server resource and we will be taken to the configuration page.
Now we will want to add a new SQL Database to the server.
To do this, just click on the + New database link in the menu bar for the SQL server.

This will open up the SQL database configuration form where we will be able to specify the details for our new BYODB database.

Start off by giving the new SQL database a Database name.
For this example we will keep everything consistent and give our SQL database a Database name of mufifebyodb.

Next we will want to choose the type of database that we will want to create. If we click on the Pricing for field we will see all of the different SQL options and also how much it will cost us a month to run the SQL server database.
By default the Standard database is selected, which (at the time of writing this) is going to cost about $15 a month.
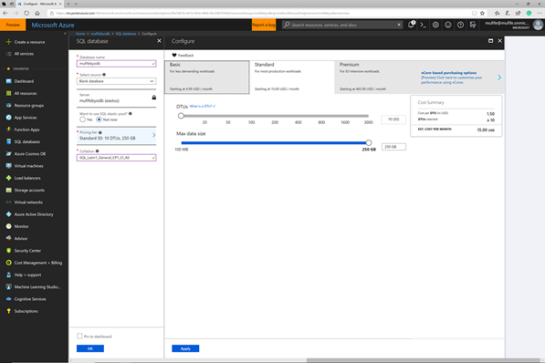
If you are feeling richer then you could select a Premium database, but for this example it’s a little bit too expensive.

So we will select the Standard database template and click on the Apply button.
After we have done that we can check the Pin to dashboard option and then click on the OK button.

This will kick off the process to create the Azure SQL database.

After a few seconds we will have a newly minted SQL database that we can start using.
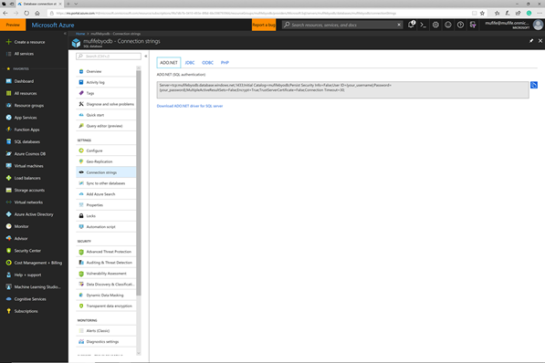
Before we move onto the next step we will want to find the Connection string for the database, and to do that we will want to click on the Show database connection string link.

This will open up a page with all of the connection string examples that we will need later on in the process.
Review
Congratulations. We now have a SQL server database that we can use to export out our data entities to.
Configuring an Entity Export to Database
Now that we have created our BYODB database that is hosted outside of the main production environment we can link it with Dynamics 365.
How to do it…
To do this we will want to open up the Data management workspace by clicking on the Data management tile on the home page of Dynamics 365.

This will open up the Data management workspace.
Now we will want to click on the Configure Entity export to database tile within the Import/Export panel.
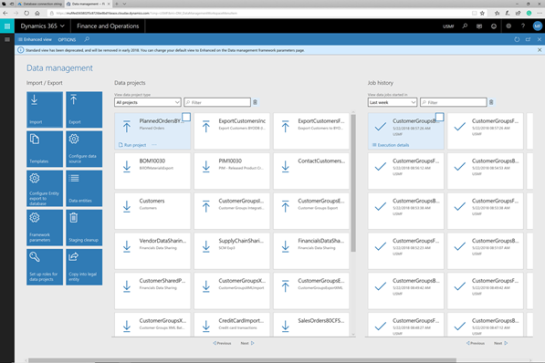
This will open up the Entity store maintenance form. Here we can create new and also maintain existing BYODB data sources.
We will want to create a new connection, so we will want to click on the + New button in the menu bar.

This will open up the New Entity Store form where we will want to define our connection details.

We will start off by giving the Entity store a Source name.
For this example we will set it to MUFIFEBYODB.

Next we will add a Description for the BYODB.
For this example we set the Description to MuFife BYODB.

Now we will return back to our Azure portal and copy the connection string for the database that we just created.

And then we will paste it into the Connection string field.

By default, the connection string doesn’t include the actual username and password for the SQL database, so we will want to update the {your username} and {your password} placeholders in the connection string.
After we have done that we can click on the Validate button to validate that the connection is correct.

If everything is good then the test will complete without any issues.

Since this is not a Premium database
then we will also want to uncheck the Create clustered column store indexes.
After we have done that we can click on the Save button.

When we return back to the Entity store page we will see that we now have a connection to the external SQL database defined.

Review
How easy was that. Now we have a connection between Dynamics 365 and an external database that we can start publishing entity data to.
Publishing Entities to the BYODB Datasource
The next step is to allow the data entities that we want to export to the BYODB to be published to the new BYODB entity store.
How to do it…
To do this we will want to find the entities within the data management workspace. To do this we click on the Data entities tile.

This will open up a list of all of the entities that are available to be published.

To whittle down the options we can filter out the list just to the usual suspects. Here we set the filter to customers so that we see the entities that relate to the customer record.

Now we will want to select the entity that we want to publish to the entity store.
In this example we will want to select the Customers V3 entity, and then we will want to click on the Publish button in the menu bar.

This will take us over to a list of all the Entity Stores that we have configured. Here we just select he BYODB that we just configured and click on the Publish button.

This will kick off a job to publish the entity to the BYODB.

When we return back we will see that the entity has been published.

If we want to see what we have just done, we can return to our Azure SQL database and click on the Query editor link.
This will open up the SQL Data Explorer form. To start seeing the data in the database we will want to login by clicking on the Login button.
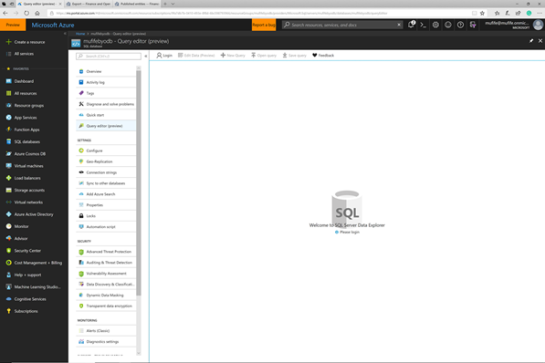
This will open up a Login page with most of the data defaulted in.

All we need to do here is type in the Password that we have set up for the SQL Admin and click on the OK button.

After logging in we will be able to see the database within the SQL explorer.

If we expand the Tables folder we will be able to see the new entity has been added to the database.

Review
Now we are cooking with gas. We have linked our entity to the BYODB and we have a table that we can start accessing. But we still don’t have any data there.
Creating an Entity Export Project
To populate the table that we have within the BYODB we will create an Export project within the Data management tools, and copy all of the data that we have in the entity over there.
How to do it…
To do this we will return back to the Data management workspace and click on the Export tile.

This will open up the Export configuration page where we can build our data export.

We will start off by giving our project a Group name.
For this example we set the Group name to CustomerBYODBExport-Full.

Then we can add a Description to the project.
For this Export we set the Description to Customer BYODB Export (Full).

Now we will want to add our entity that we just published to the BYODB data source into the project.
We do that by clicking on the + Add entity button.

Now we can select the published entity that we want to include in the export.
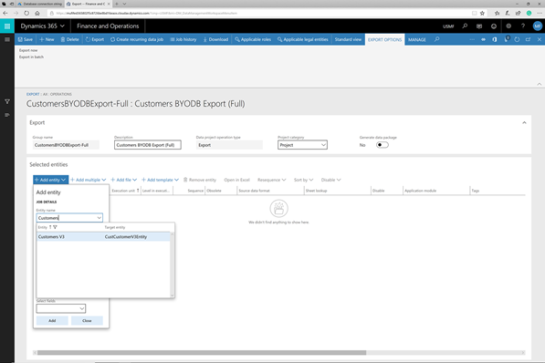
Next, we will want to choose the Target data format that we will want to export the data in. When we scroll through the list of different options, we will see that our BYODB Entity Store is now showing up on the list.
So now we will select the MUFIFEBYODB as our Target data format.

Now we will want to select the Default refresh type that we will use for this export. We can either just select the incremental updates or we can get all of the data and do a full update.
For this export we want to publish all of the data that is in the table, so we will want to set the Default refresh type to Full push only.

After we have done that we can click on the Add button to add the entity and format mapping to the project.

Once we have done that we will see that behind the form, the entity mapping has been added. At this point we can just close the Add entity dropdown dialog.

Now that we have defined our project and the entity mapping that we want to use to push the data over to the BYODB Entity store, we can start the transfer process.
To do this we just need to click on the Export button in the menu bar.

This will schedule the export job to run in the background, and we can click on the Close button to dismiss the message box.

We will then see the current export job’s details. To see the progress we just click on the Refresh button.

It won’t take too long before the job will have processed and we will see that the data has been pushed from the entity over to the BYODB Entity Store.
In this example 48 customer records have been exported.

To see the data in the Entity Store we can return over to the Azure SQL database and click on the + New Query to start a new SQL query pane.
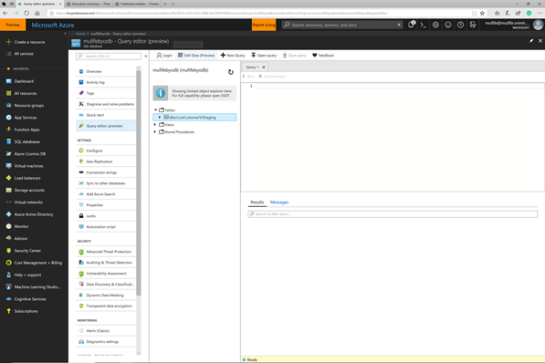
Inside the query we can enter a simple SQL select statement to see all of the data in the table.
All we need to do is type Select * from dbo.CustCustomerV3Staging and then click on the Run icon.

This will run the query and in the Results panel we will see all o the records that are now in the BYODB database.

If we scroll over just a little we will be able to see the customer details including the name and the customer account.

Review
How easy was that. Once we have created our Export entity in the Data Management workspace then we can add any published entity to the export projects and push the data over there.
Enabling Change Tracking on Data Entities
Now that we have all of our data transferred over to the BYODB Entity Store, we don’t want to stop there. We want to also make sure that any new data that is added to the table within Dynamics 365 is also transferred over.
We could just rerun the full export job that we just created to add new data, but that would be a little inefficient especially for Entities that may have a lot of data in them.
So now we will want to create another export project that just pushed the incremental changes. To do this we will first need to turn on Change tracking on the entity that we want to push so that the system will watch for changed records.
To do this we will open up the Target entities list and find the entity that we just created the full export for. In this case it’s the Customers V3 entity.
Then we will want to open up the CHANGE TRACKING action panel and we will see that there are a few different options for tracking changes on the entity.
For this example we will want to track all of the changes, including the changes to subsidiary tables, so we will click on the Enable entire entity button.

This will enable change tracking on the entity.

Review
That was easy.
Creating an Incremental Data Export Project
Now we that we have enabled change tracking on the Customers V3 entity we can use the change tracking to create an incremental update export job that will run in the background and continuously check for new and changed data to move over to the BYODB Entity Store.
To do this we will return to the Data management workspace and click on the Export tile to create another export project.

This will open up the Export project definition form.

We will want to give our export project a unique Group name.
In this example we will set the Group name to Customer BYODBExport-Incremental.

Next we will give out export project a Description.
Here we wet the Description to Customer BYODB Export (Incremental).

Now we can start adding our entities that we want to export by clicking on the + Add entity button.

We will want to click on the Entity name dropdown list and select the entity that we want to do the incremental update for.
In this example we will select the Customers V3 entity from the list, which is the one that we enabled change tracking on.

And next we will select the BYODB Entity Store from the Target data format dropdown.
For this example we selected the MUFIFEBYODB
Target data format.

This time we will want to select the Incremental push only from the Default refresh type which will tell it to just look for the changed data.
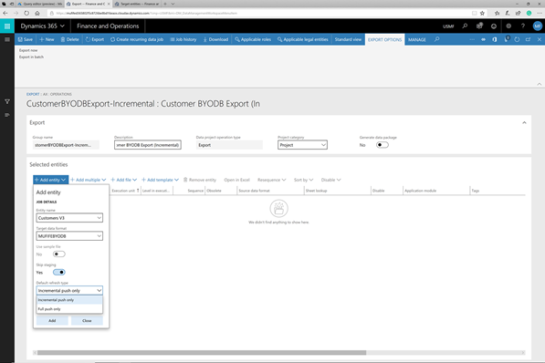
After we have done that we can add it to the export project by clicking on the Add button.

This will add the entity export to the project and we can close the Add entity dropdown form.

Now that we have the project created we will want to schedule this to run periodically rather than having to manually kick the process off.
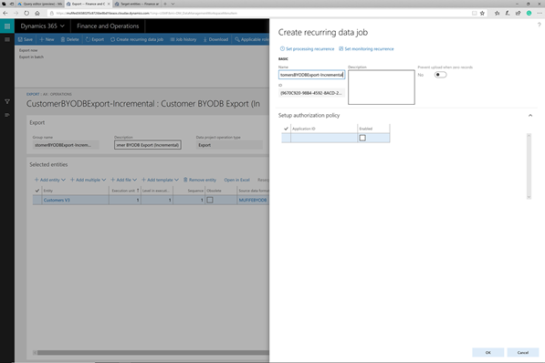
To do this we will want to click on the Create recurring data job menu item.

This will open up the panel that will allow us to define the batch job details.
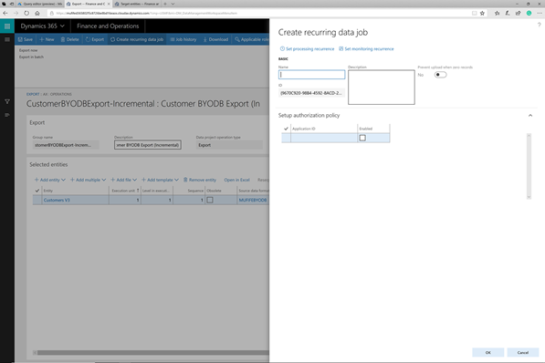
We will start off by giving our batch job a unique Name.
For this example we set the Name to be CustomerBYODBExport-Incremental.
Now we want to schedule the recurrence frequency of the job.
We can do that by clicking on the Set processing recurrence link.
This will open up the Define recurrence panel where we are able to set the frequency of the job runs.

For this job, we will want it to refresh each day, so we will select the Day recurrence pattern.
Then we can click on the OK button.

This will return us back to the Create recurring data job panel.
There is one last thing that we need to do here and that is to give the batch job an Application ID from Azure that it will use to authenticate through with.

Here is a quick cheat. Open up the Azure Active Directory applications form and there should be some there that have already been authorized to use Dynamics and we can copy the Client Id from here.

All we need to do is paste in the Application Id into the field.

Finally, we will just want to check the Enable flag for the Application Id that we just added and then click on the OK button.

This will open up a dialog box asking us if we want to enable the recurring job and we will want to click on the Yes button.

After we have one that we are done. The incremental export will run every day and update the BYODB Entity Store with any new or changed data.

Review
How easy was that?
Conclusion
Congratulations. We have now set up a new SQL database in Azure that other applications can access and we have not only published the data from an existing entity in Dynamics 365, but we have also created a refresh job that will go out and add any incremental data to the BYODB Entity store periodically.
This is very
Share this post
- 0 comment
- Tags: Uncategorized
0 comment