Adding Filtered Queries as New Tiles on Workspaces within Dynamics AX
Posted by Author, Curator, Visually Impared Squirrel Literacy Advocate & Dynamics AX Technical Solution Professional (TSP) at Microsoft on

Workspaces are a great place to live within because they give you access to all of the key information that you may need all in one page. One of the new metaphors that are introduced with the Workspaces are the tiles which show up on the left hand side of the workspace and give you the ability to see a count of records that you may be working through and also allow you to quickly jump to the data by clicking on them.
The workspaces come pre-populated with a set of common tiles that you may want to use, but that is just the beginning, because you can add additional tiles yourself to the workspaces and add links to other data that you may be interested in seeing within the Workspace overview page to help you with your day to day work.
In this example we will walk you through the addition of the tiles to the workspaces and show you how they work.
How to do it…
To do this, start off by opening up the list page that you want to create a new workspace tile for. In this example we opened up the All Sales Orders list page.

If you want to filter the data, then just click on the fields filter dropdown list and enter in the filter criteria. In this case we selected the order Status field and then entered in Delivered into the criteria field.
Then click on the Apply button.
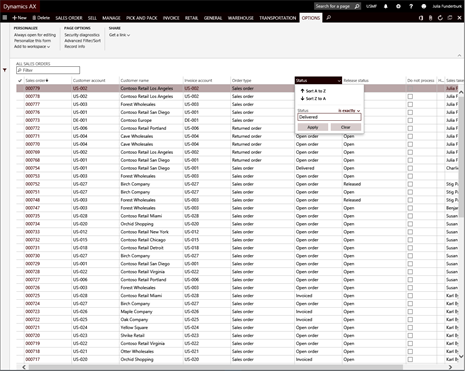
Now you have a filtered list.
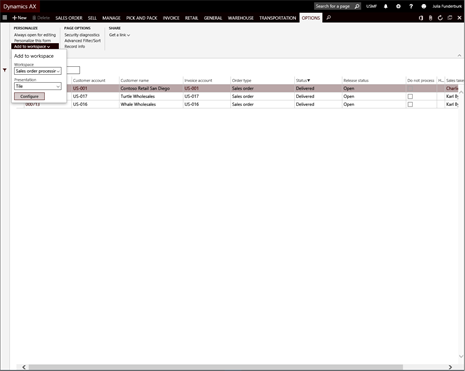
Next, switch to the Options ribbon bar.

This will allow you to then click on the Add to Workspace dropdown menu.

Click on the Workspace dropdown list and select the workspace that you want to add the tile to. In our example we selected the Sales Order Processing and Invoicing workspace.

Then click on the Presentation dropdown list and select the type of view you want to create. We selected Tile in this example, but if you choose List then it will still add the view, but it will be in the List section of the workspace.

After you have done that, click on the Configure button.
This will open up an Add as tile dialog box of the right hand side of the form.

If you want, you can rename the Name on tile to make it more specific to the query. We named ours Delivered Sales Orders.
Then click on the OK button.

When you open up the workspace that you added the tile to then you will see that it is now available for everyone to click on.

Clicking on it will take you straight to the list page and filter out the data for you.

Review
Being able to add tiles to your workspace is a great productivity tool to have in your back pocket. Although you may want to see all of the data sometimes, usually people are working with subsets of the data, and addressing exceptions rather than all of the information. By filtering out the data to just the information that you want to see and adding it as a tile (or as a list) then you get a way to track how much work that you have, and also make sure that you are working on all of the items that you need to work on. There is nothing worse than hunting through pages of data to find the exceptions.
The tiles allow you to get all the information that you need to see all packaged up within a box – literally.
Share this post
- 0 comment
- Tags: Uncategorized
0 comment